

Welcome to the ultimate solution for a convenient, healthy, and incredibly satisfying breakfast: these savory, gluten-free Protein Biscuits! Imagine waking up to a ready-made, warm biscuit packed with flavor and nutrition. These aren’t just any biscuits; they’re an ingenious blend of fluffy texture and hearty ingredients, designed to fuel your busy mornings without any fuss. Each biscuit delivers a robust 13 grams of total protein, coming directly from wholesome sources like lean chicken sausage and cheese, completely eliminating the need for any protein powder. Soft, moist, and utterly delicious, they offer a perfect balance of savory notes that will make them an instant favorite in your meal prep routine. Get ready to transform your breakfast game with this easy-to-make, grab-and-go masterpiece!

Why These Gluten-Free Protein Biscuits Are a Must-Try
Are you searching for a breakfast that’s both deeply satisfying and genuinely good for you? Look no further! These high-protein biscuits redefine breakfast convenience. What could be better than the harmonious combination of savory sausage, sharp cheddar cheese, and wholesome eggs, all baked into one perfectly portioned, protein-packed biscuit? This recipe stands out for its simplicity, vibrant flavor profile, and commitment to fresh, wholesome ingredients. They are an exceptional way to kickstart your day with a significant protein boost, ensuring you stay full and energized.
Beyond their incredible taste, these biscuits are a meal-prep dream come true. You have the flexibility to use the delicious homemade ground chicken sausage recipe provided below, or opt for your favorite store-bought ground sausage for an even quicker preparation. Either choice yields fantastic results, making this protein biscuit recipe ideal for batch cooking. Simply reheat them for a low-maintenance, nutritious breakfast that’s ready in minutes. For those looking to master the art of gluten-free baking, be sure to explore my original recipe for fluffy gluten-free biscuits!
Key Features & Benefits of This Protein Biscuit Recipe
- **Naturally Gluten-Free:** Crafted with premium gluten-free flour, making them safe and enjoyable for those with gluten sensitivities or dietary preferences.
- **Macro-Friendly:** Thoughtfully designed to fit various dietary plans, providing a balanced profile of protein, carbohydrates, and healthy fats.
- **Effortlessly Easy to Make:** Simple steps ensure a smooth baking experience, even for novice bakers.
- **Wholesome & Pure:** Made with fresh, natural ingredients and free from artificial preservatives.
- **High Protein Content:** Each biscuit packs a remarkable 13 grams of protein, supporting muscle maintenance and satiety.
- **Nutrient-Rich Ingredients:** Utilizes healthy components that contribute to overall well-being.
- **Sustained Energy Source:** Provides excellent, long-lasting energy to power you through your morning.
- **No Protein Powder Needed:** All protein comes from whole food sources, offering a more natural and satisfying taste.
- **Bursting with Savory Flavors:** A delightful blend of chicken sausage, cheese, and aromatic spices creates an irresistible savory profile.
- **Buttery, Flaky, and Moist Texture:** Expect tender, melt-in-your-mouth biscuits with a perfect internal moisture.
- **Convenient One-Bowl Preparation:** Minimizes cleanup, making the baking process even simpler.
- **No Biscuit Cutter Required:** These rustic drop biscuits are designed for ease, no special tools needed!
- **Perfect for Meal Prep:** Bake a batch and have healthy breakfasts ready for days.
- **Freezer-Friendly:** Easily stored for future enjoyment, ensuring a quick breakfast is always on hand.
Detailed Ingredient Breakdown & Tips
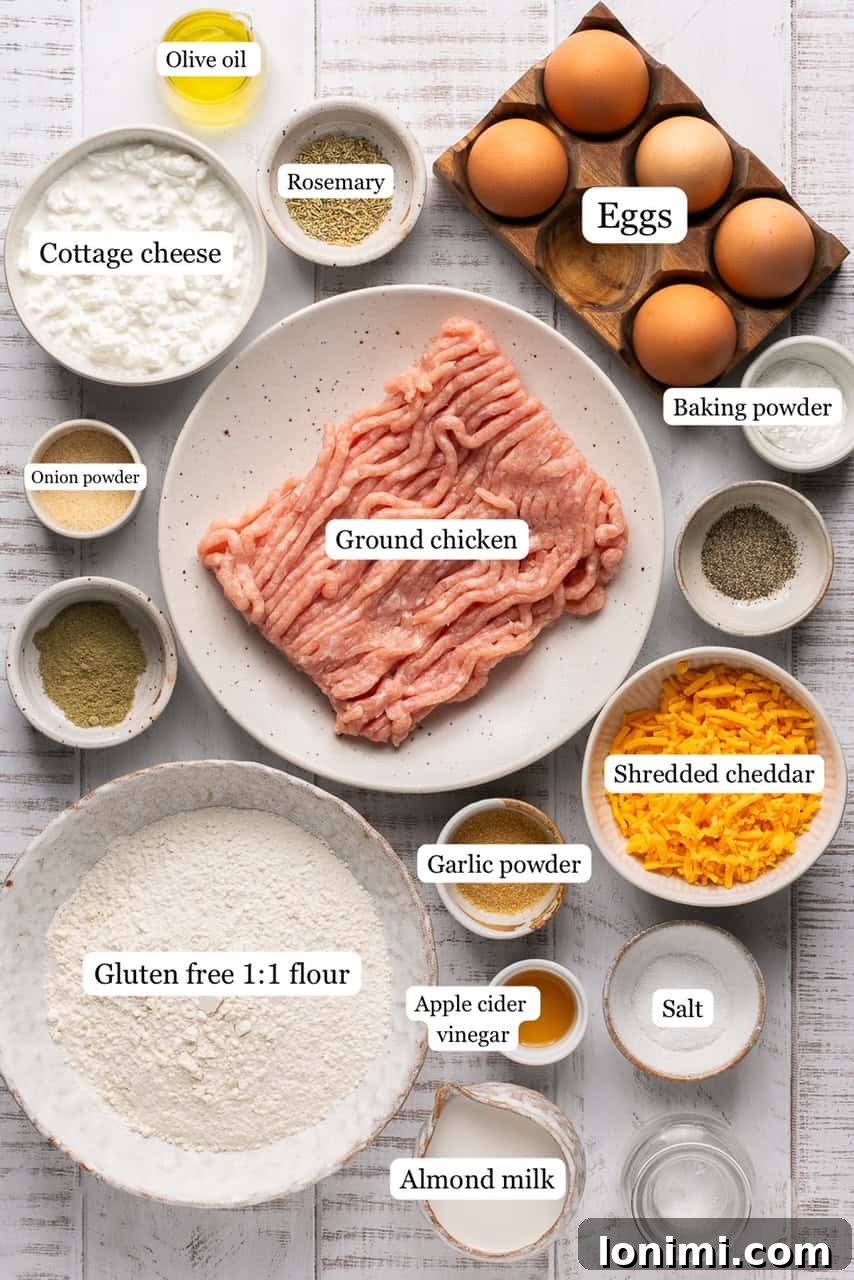
- Ground Chicken: I highly recommend lean ground chicken as it provides an excellent source of protein with minimal fat, resulting in less grease to drain. This contributes to a healthier biscuit without compromising on flavor. Feel free to substitute with ground turkey or lean ground pork; the key is to choose a lean animal protein for optimal results and a less greasy texture.
- Sage: Ground sage is crucial for creating that classic, comforting breakfast sausage flavor in your homemade chicken sausage. Its earthy, peppery notes are indispensable.
- Garlic Powder & Onion Powder: These aromatic powders are flavor powerhouses, adding depth and a savory base to both the chicken sausage and the biscuit dough. They contribute significantly to the overall deliciousness.
- Gluten-Free Flour: For consistent, reliable results, I strongly recommend King Arthur Baking Gluten Free 1:1 Measure for Measure flour. This blend is specifically formulated for easy substitution in traditional recipes and yields a wonderful texture. Please note that I have not tested this recipe with coconut flour or almond flour, as they have different absorption rates and might drastically alter the biscuit’s texture and moisture.
- Baking Powder: Essential for lift and fluffiness! Always double-check to ensure you’re using a gluten-free and aluminum-free baking powder to avoid any metallic aftertaste and adhere to gluten-free dietary needs.
- Dried Rosemary: Rosemary infuses these biscuits with a fragrant, herbaceous aroma and a subtle piney flavor that complements the savory sausage perfectly. If you prefer using fresh minced rosemary, simply double the amount called for to achieve a similar intensity. Rosemary extract can also be an alternative if you have it on hand.
- Eggs: Eggs serve multiple purposes in this recipe: they act as a binder, provide structure, and contribute additional protein and richness to the biscuits.
- Cottage Cheese: This might sound unconventional, but trust me—you won’t taste the cottage cheese or feel its texture in the final product! It’s a secret ingredient that adds incredible moisture and a significant protein boost without affecting the flavor. If you’re hesitant, plain Greek yogurt can be used as a substitute, but ensure it’s thick and not too watery.
- Shredded Cheese: Any variety of shredded cheese will work, but sharp cheddar cheese is my personal favorite. It melts beautifully and adds a rich, tangy flavor that pairs wonderfully with the sausage. Feel free to experiment with Monterey Jack, mozzarella, or a cheddar blend.
- Almond Milk: Unsweetened almond milk is my preferred choice for this recipe, offering a neutral flavor. However, any milk of choice (dairy or non-dairy, unsweetened) will work equally well to provide the necessary liquid for the dough.
- Apple Cider Vinegar: This ingredient is key to creating a homemade “buttermilk” effect when combined with milk. The acidity reacts with the baking powder, contributing to a lighter, more tender biscuit texture.
- Egg Wash: A simple egg wash (one egg whisked with a splash of water) brushed over the biscuits before baking is a game-changer. It helps achieve that beautiful golden-brown crust and a slightly crispy exterior, enhancing both appearance and texture.
Step-by-Step Guide to Crafting Perfect Protein Biscuits
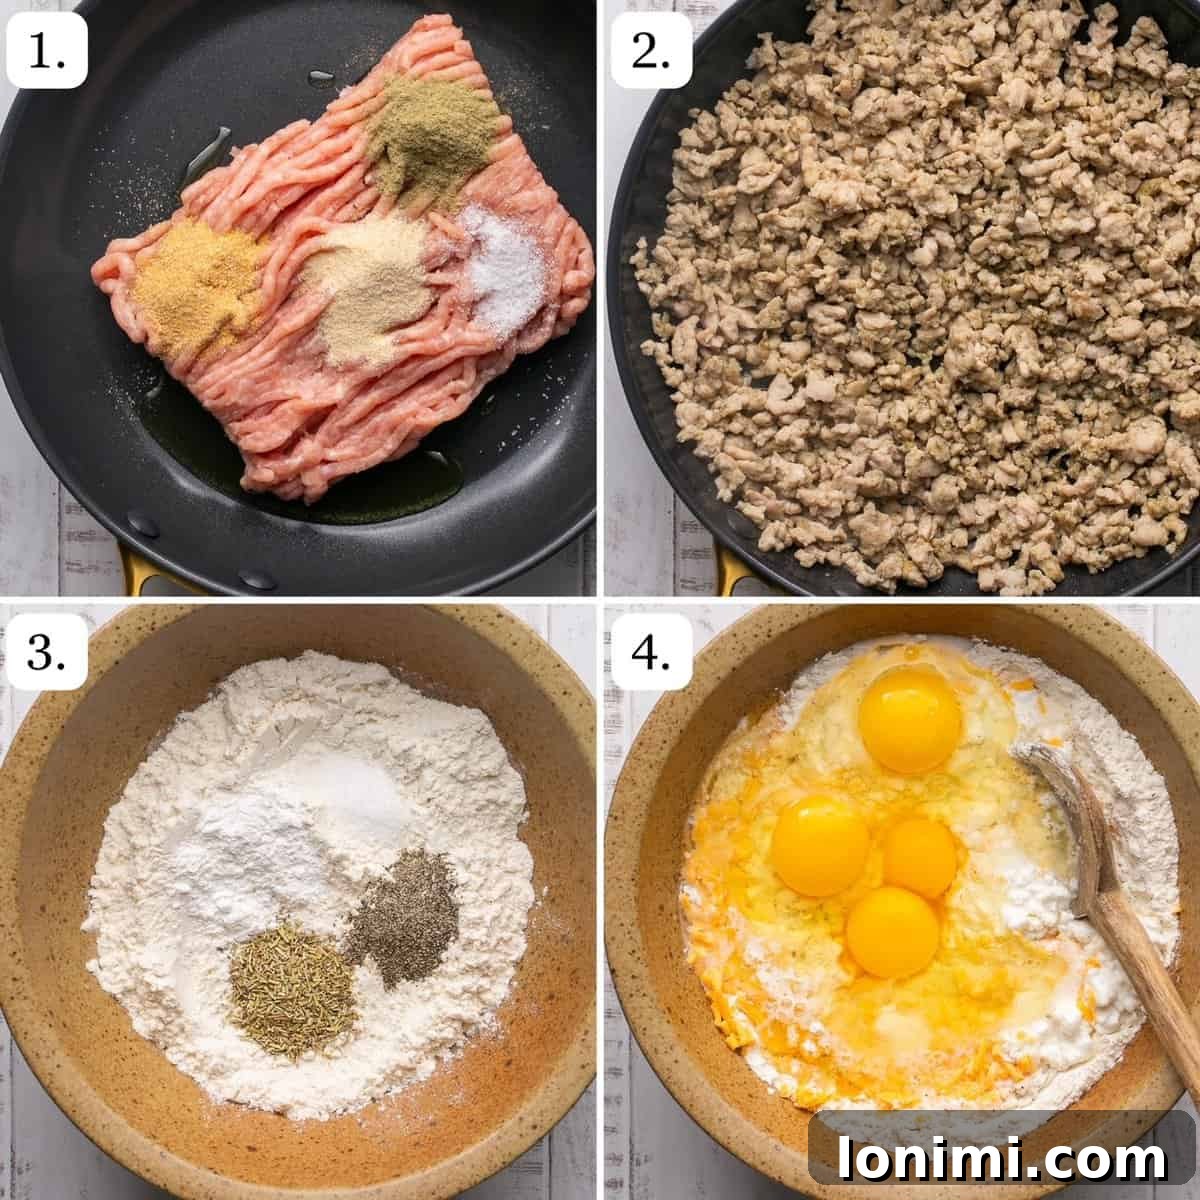
Achieving warm, flaky, and protein-packed biscuits has never been easier! Follow these straightforward steps to have a batch of deliciousness on your table in no time.
Step 1: Prepare the Sausage
Begin by preheating your oven to a robust 450°F (230°C). In a large skillet, heat 1 tablespoon of olive oil or avocado oil over medium-high heat. Add the lean ground chicken, along with ½ teaspoon of salt, 1 teaspoon of garlic powder, 1 teaspoon of onion powder, and 1 teaspoon of ground sage. Cook the chicken for 5-6 minutes, using a wooden spoon to break it up into small, even pieces, until it is thoroughly cooked through and no longer pink. Carefully drain any excess fat from the skillet and set the cooked sausage aside to cool slightly.
Step 2: Combine Dry Ingredients
In a spacious large mixing bowl, measure and add all the dry ingredients: the gluten-free flour blend, baking powder, the remaining ½ teaspoon of salt, a dash of freshly ground black pepper, and the dried rosemary. Whisk these dry components together thoroughly to ensure they are well combined and evenly distributed. This step is crucial for an even rise and consistent flavor in your biscuits.
Step 3: Incorporate Wet Ingredients
To the same bowl containing your dry ingredients, add the wet components: the four eggs, the ½ cup of cottage cheese, the ½ cup of shredded cheddar cheese, your milk of choice (preferably unsweetened almond milk), and the 1 teaspoon of apple cider vinegar. The apple cider vinegar will react with the milk to create a “buttermilk” effect, enhancing the tenderness of the biscuits.
Step 4: Mix the Dough
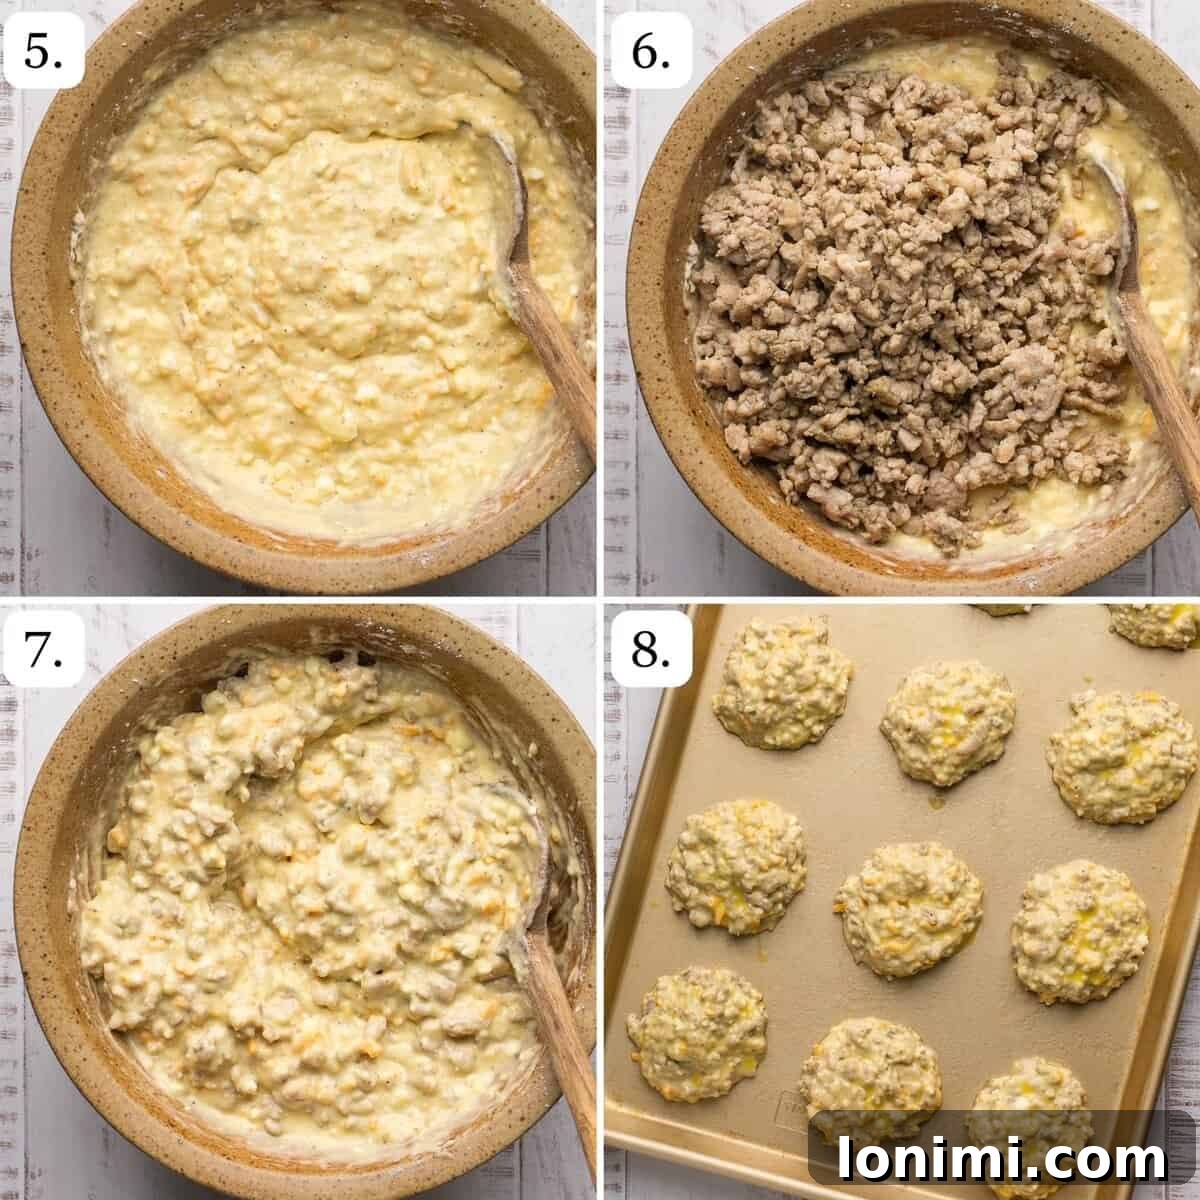
Using a sturdy spoon or a spatula, stir all the wet and dry ingredients together until they are just combined. Be careful not to overmix; overworking the dough can lead to dense, tough biscuits. A few lumps are perfectly fine and even desirable for a tender texture.
Step 5: Fold in the Sausage
Gently add the cooled, cooked ground chicken sausage to the biscuit dough. Using a spatula, delicately fold the sausage into the mixture until it is evenly distributed throughout. Again, avoid vigorous mixing to maintain the biscuit’s light texture.
Step 6: Prepare for Baking
Line a large baking sheet with parchment paper, then lightly spray it with avocado oil or another non-stick spray. Using a spoon or an ice cream scoop, drop twelve equally sized portions of the biscuit dough onto the prepared baking sheet, leaving some space between each one for expansion. Each biscuit should be roughly 3 inches wide and 1.5 inches tall.
Step 7: Apply Egg Wash & Bake
In a small bowl, whisk together one egg with a teaspoon of water to create your egg wash. Lightly brush the tops of each biscuit with this mixture; this will help them achieve a beautiful golden-brown color and a slightly crisp crust. Transfer the baking sheet to your preheated 450°F (230°C) oven and bake for 13-15 minutes, or until the edges are nicely browned and the biscuits have puffed up significantly. Once baked, remove the tender biscuits from the oven and allow them to cool completely on the baking sheet before serving. Enjoy your homemade, high-protein breakfast!

Pro Tips for Perfect Protein Biscuits Every Time
- Do Not Overmix the Dough: This is arguably the most crucial tip for any biscuit recipe! Overmixing develops the gluten in the flour, even in gluten-free blends, leading to a dense, tough, and less fluffy biscuit. Mix only until the ingredients are just combined, leaving a few small lumps is perfectly fine for a tender result.
- Boosting Protein Further: While these biscuits are already packed with protein from whole food sources, if you wish to add an additional boost, you can incorporate one scoop of unflavored protein powder or collagen peptides into the dry ingredients. Ensure it’s unflavored so it doesn’t interfere with the savory profile.
- Cottage Cheese Consistency Matters: I achieved excellent results using Good Culture brand cottage cheese, which tends to be thicker. If your cottage cheese is noticeably runny or thin, your biscuit batter might be too wet. To counteract this, add 1-2 extra tablespoons of gluten-free flour to your batter until it reaches a thick, spoonable consistency. The batter should not appear super runny when dropped onto the baking sheet.
- Consistent Sizing for Even Baking: This recipe is designed to yield 12 biscuits. For best results and even baking, aim for each dropped biscuit to be approximately 3 inches wide and 1.5 inches tall on the baking sheet. This consistency ensures all biscuits cook through at the same rate.
- Shaping for Aesthetics: Since these are drop biscuits, they might not be perfectly round. If you prefer a more uniform, classic biscuit shape, gently use your hands (lightly floured, if needed) to form them into neat rounds after spooning them onto the sheet. You can also use a round cookie cutter, though it’s not strictly necessary.
- Proper Storage: To maintain freshness and flavor, store any leftover protein biscuits in an airtight container or wrapped tightly in plastic wrap. They will keep well in the refrigerator for up to 4 days, making them perfect for grab-and-go breakfasts throughout the week.
- Effortless Reheating: Reheating these biscuits is a breeze! For a quick warm-up, simply pop them into the microwave for 30-60 seconds. Alternatively, for a slightly crisper exterior, reheat them in an air fryer at 360°F (180°C) for 2-3 minutes. They will taste almost as good as freshly baked!
For another delightful brunch or breakfast idea, why not try these irresistible Hawaiian Roll Cinnamon Rolls?

Protein Biscuits: Frequently Asked Questions
Are protein biscuits typically gluten-free?
Traditional biscuits are usually made with wheat flour, meaning they contain gluten. However, this specific recipe is crafted to be entirely gluten-free! By using a high-quality 1:1 measure-for-measure gluten-free flour blend, we’ve created delicious, tender, and protein-packed biscuits that are safe and enjoyable for those following a gluten-free diet.
Can you freeze these protein biscuits for later?
Absolutely! These protein biscuits are incredibly freezer-friendly, making them perfect for long-term meal prep. Once completely cooled, place them in an airtight container or a freezer-safe bag. They will maintain their quality in the freezer for up to 3 months. When you’re ready to enjoy, simply thaw them overnight in the refrigerator or reheat them directly from frozen in the microwave or air fryer, adding a minute or two to the reheating time.
Is it possible to make these biscuits dairy-free?
Making these biscuits entirely dairy-free presents a challenge due to two key ingredients: cottage cheese and shredded cheese. Both play crucial roles in providing structure, binding the biscuits together, and contributing significantly to the high protein content of this recipe. If you’re determined to try a dairy-free version, you could experiment with dairy-free milk alternatives, dairy-free shredded cheese shreds, and a thick dairy-free Greek yogurt (ensure it’s plain and unsweetened) in place of the cottage cheese. Please note that the texture and flavor might differ, and you may need to adjust the flour amount based on the moisture content of your dairy-free substitutes. If you do attempt it, I’d love to hear about your results in the comments below!

Explore More Gluten-Free High Protein Recipes
If you’re loving the protein boost in these biscuits, you’ll be thrilled to discover more delicious and nutritious gluten-free options:
- Perfect Gluten-Free Protein Pancakes
- Easy Vegan Baked Protein Oats
- Energizing Overnight Oats with Protein Powder
- Wholesome Banana Protein Muffins
- Quick & Healthy Chocolate Protein Mug Cake
Love this recipe? Please consider leaving a 5-star 🌟🌟🌟🌟🌟 rating and a review in the comment section below. Your feedback helps me create more content you’ll love! Or, follow me on Facebook, Pinterest or Instagram today to stay updated with new recipes!

Print Recipe
Homemade Gluten-Free Protein Biscuits
Mary Smith
10 mins
15 mins
25 mins
12 biscuits
These gluten-free Protein Biscuits are the best savory make-ahead breakfast to have on the go! They are packed with homemade chicken sausage, cheese, and deliver 13g total protein per biscuit. Soft, moist, and absolutely delicious, they require no protein powder.
Equipment
- 1 baking sheet
- Large mixing bowl
- Large skillet
- Wooden spoon or spatula
Ingredients
- 1 tbsp olive oil, or avocado oil
- 1 lb lean ground chicken, or ground turkey
- 1 tsp salt, divided (½ tsp for sausage, ½ tsp for biscuits)
- 1 tsp sage
- 1 tsp garlic powder
- 1 tsp onion powder
- 1.5 cups gluten-free flour (King Arthur Baking 1:1 Measure for Measure recommended)
- 1.5 tsp baking powder (ensure it’s gluten-free and aluminum-free)
- ½ tsp pepper
- 1 tsp dried rosemary (use 2 tsp if fresh, minced)
- 4 eggs
- ½ cup cottage cheese (Good Culture 2% brand recommended; if runny, add 1-2 extra tbsp GF flour)
- ½ cup shredded cheddar cheese
- ½ cup milk of choice (unsweetened almond milk used here)
- 1 tsp apple cider vinegar
For the Egg Wash:
- 1 large egg
- 1 tsp water
Instructions
- Preheat your oven to 450°F (230°C).
- Heat 1 tbsp oil in a large skillet over medium-high heat. Add ground chicken, ½ tsp salt, 1 tsp garlic powder, 1 tsp onion powder, and 1 tsp sage. Cook for 5-6 minutes, breaking up the chicken with a wooden spoon, until cooked through. Drain any fat and set aside.
- In a large mixing bowl, combine the gluten-free flour, baking powder, the remaining ½ tsp salt, pepper, and rosemary. Mix well.
- To the same bowl, add the 4 eggs, cottage cheese, shredded cheddar, ½ cup milk of choice, and 1 tsp apple cider vinegar. Stir until well combined, being careful not to overmix.
- Add the cooked ground chicken sausage to the biscuit dough. Gently fold it in until just combined.
- Line a large baking sheet with parchment paper and lightly spray with avocado oil. Spoon 12 equal portions of the biscuit dough onto the baking sheet.
- In a small bowl, whisk together 1 egg and 1 tsp water to make an egg wash. Brush the tops of each biscuit with the egg wash for a golden finish.
- Bake for 13-15 minutes, or until the edges are golden brown and the biscuits have puffed up. Allow the tender biscuits to cool completely on the baking sheet before serving. Enjoy!
Notes
Do not overmix: Overmixing the biscuit dough can lead to a dense and tough texture. Mix only until ingredients are just combined.
Extra protein: For an additional protein boost, feel free to mix 1 scoop of unflavored protein powder or collagen into the dry ingredients.
Batter Consistency: If your cottage cheese is very thin or runny, the batter might be too wet. In this case, add 1-2 extra tablespoons of gluten-free flour until the batter is thick enough to hold its shape when spooned onto the baking sheet.
Sizing: This recipe yields 12 biscuits. Each should be approximately 3 inches wide and 1.5 inches tall after being spooned onto the baking sheet.
Shape: If you prefer a more uniform biscuit shape, gently mold them with your hands after dropping them onto the sheet. A round cookie cutter can also be used.
Storage: Store any leftover protein biscuits in an airtight container or wrapped in plastic wrap in the refrigerator for up to 4 days.
Reheating: To reheat, microwave for 30-60 seconds, or use an air fryer at 360°F (180°C) for 2-3 minutes for a crispier result.
Nutrition Facts (Estimated Per Serving)
Serving: 1 biscuit |
Calories: 174 kcal |
Carbohydrates: 12g |
Protein: 13g |
Fat: 8g |
Saturated Fat: 3g |
Polyunsaturated Fat: 1g |
Monounsaturated Fat: 3g |
Trans Fat: 0.04g |
Cholesterol: 107mg |
Sodium: 370mg |
Potassium: 255mg |
Fiber: 2g |
Sugar: 1g |
Vitamin A: 161IU |
Vitamin C: 0.1mg |
Calcium: 105mg |
Iron: 1mg
All nutrition facts are estimates and automatically calculated. While I cross-reference them using My Fitness Pal, please note that they may not always be 100% accurate and depend on the specific brands and ingredients used. For the most precise grams per serving size, I recommend weighing your total batch and dividing by the number of servings.