

Indulge in the perfect balance of sweet and tart with these easy gluten-free scones, featuring vibrant orange and juicy cranberries. This recipe delivers irresistibly flaky, tender, and subtly sweet scones, making them the ultimate accompaniment to your morning coffee or afternoon tea. Plus, they’re effortlessly adaptable for a dairy-free diet!

Unveiling the Magic of These Gluten-Free Orange Cranberry Scones
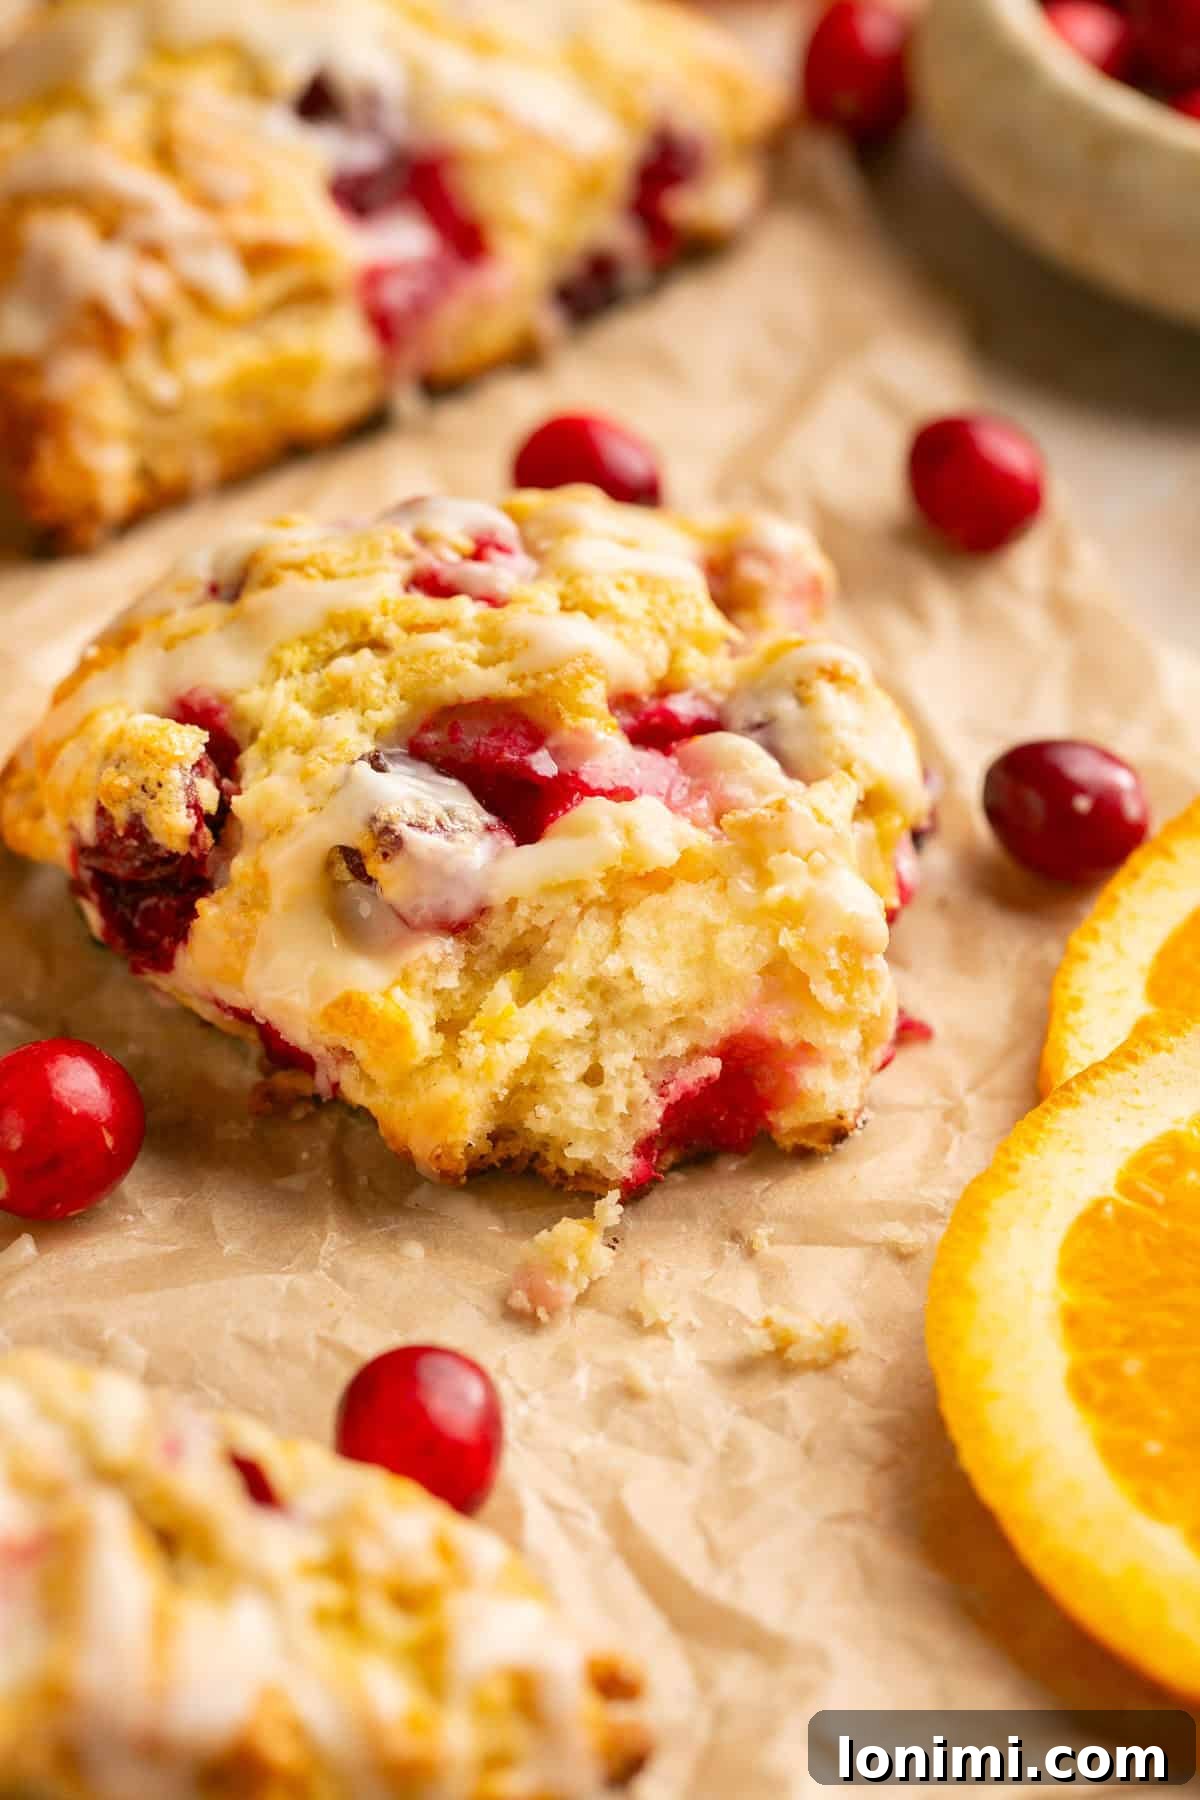
There’s something truly special about a freshly baked scone, and for many, the thought of a perfect, flaky scone with a warm cup of coffee is pure bliss. This particular recipe for easy gluten-free orange cranberry scones takes that experience to a whole new level. Imagine a light, tender crumb encased in a slightly crisp exterior, bursting with the bright zest of orange and the delightful tartness of cranberries. Topped with a sweet orange glaze, these scones are not just a breakfast item; they are a heavenly holiday treat or a comforting pick-me-up any day of the week.
What sets this recipe apart is its ability to deliver that authentic bakery-style scone taste and texture, all while being completely gluten-free. Forget dense, crumbly gluten-free baked goods; these scones are remarkably flaky and moist. We achieve this by utilizing a high-quality measure-for-measure gluten-free flour blend, ensuring results that rival their traditional counterparts. Beyond being gluten-free, this recipe is also incredibly versatile. Craving a dairy-free option? We’ve got you covered with simple substitutions. Not a fan of orange and cranberry? This recipe serves as a fantastic base for a myriad of other delightful flavors, which we’ll explore further down this post.
Baking can sometimes feel intimidating, especially when adapting to dietary restrictions, but this recipe is designed to be fool-proof. From mixing the dry ingredients to shaping the dough and applying the final luscious glaze, each step is straightforward, making it an enjoyable process for bakers of all skill levels. Get ready to impress yourself and your loved ones with these spectacular homemade gluten-free scones!
Why You’ll Adore This Gluten-Free Scones Recipe
These orange cranberry scones aren’t just delicious; they come with a host of benefits that make them a standout recipe in your gluten-free baking repertoire:
- Effortlessly Gluten-Free with Dairy-Free Versatility: Tailored for those with gluten sensitivities or celiac disease, this recipe also offers easy dairy-free modifications, opening up this delightful treat to even more people.
- Authentic Bakery-Style Taste and Texture: Prepare to be amazed! These scones boast the coveted flaky layers and tender crumb characteristic of professional bakeries, without any gluten.
- Remarkably Easy to Make: Don’t let the “gluten-free” label intimidate you. This recipe is designed with simplicity in mind, making it accessible for novice bakers and a quick win for experienced ones.
- A Foolproof Baking Experience: With clear instructions and helpful tips, you’re set for success every time. Say goodbye to guesswork and hello to consistently perfect scones.
- Simplifying Gluten-Free Baking: This recipe demonstrates just how easy and rewarding gluten-free baking can be, dispelling common myths about its complexity.
- Perfect for Any Occasion: Whether it’s a special holiday breakfast, a festive dessert, or a cozy weekend brunch, these scones are always a welcome addition.
- Conveniently Freezer-Friendly: Bake a big batch and store them in the freezer for a quick, delicious treat whenever a craving strikes or unexpected guests arrive.
- Fun for the Whole Family: Get everyone involved in the kitchen! This recipe is simple enough for kids to help with, making it a wonderful activity to share.
Key Ingredients for Flawless Gluten-Free Scones
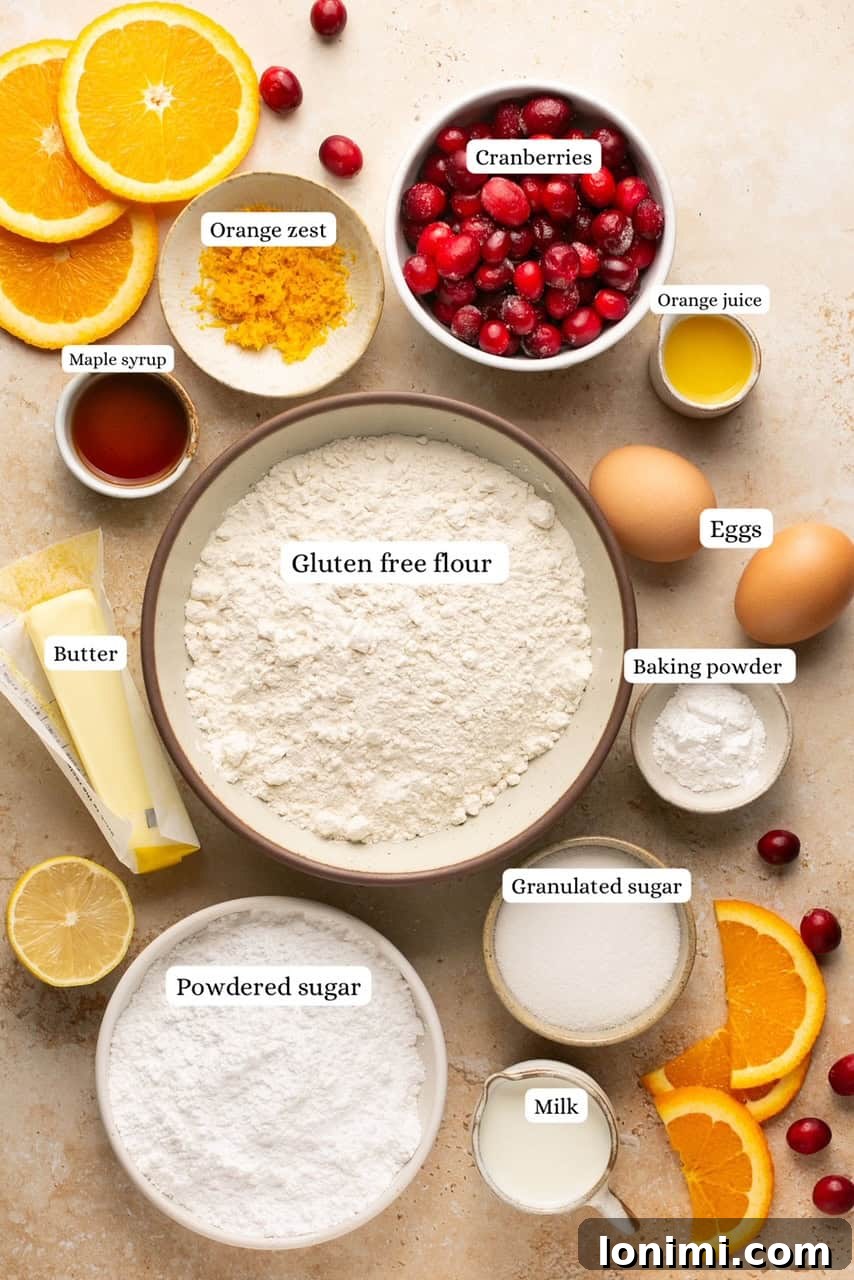
Every great recipe starts with quality ingredients, and these gluten-free scones are no exception. Here’s a closer look at what you’ll need and why each component is essential for achieving that perfect texture and flavor:
Gluten-Free Flour Blend: The foundation of our scones. I highly recommend using King Arthur Measure for Measure Gluten-Free Flour. This blend is specifically formulated to replace wheat flour cup-for-cup in most recipes, yielding excellent results without any gritty texture or off-flavors often associated with other gluten-free flours. Its consistent performance ensures your baked goods are always tender and well-structured. While other blends can work, results may vary, so stick with a trusted “measure for measure” or “1:1” blend for best success. Avoid using single gluten-free flours like almond or coconut flour, as they require entirely different liquid ratios.
Granulated Sugar: This provides a delicate sweetness to the scones, balancing the tartness of the cranberries. We’ll use it not only within the dough but also for sprinkling on top before baking. This extra sprinkle of sugar creates a beautiful, slightly caramelized crunch on the exterior, adding an appealing texture contrast.
Gluten-Free Baking Powder: A crucial leavening agent that helps our scones rise beautifully, creating those desirable flaky layers. For those with celiac disease or severe gluten sensitivities, always double-check the label to ensure your baking powder is certified gluten-free, as some brands may contain wheat starch. Fresh baking powder is key for optimal rise, so ensure yours isn’t expired.
Salted Butter: The secret to truly flaky scones! It’s absolutely essential that your butter is frozen or very, very cold. When cold butter melts in the hot oven, it releases steam, which creates pockets of air and separates the dough into layers, resulting in that signature flakiness. If you need a dairy-free alternative, high-quality vegan butters like Miyoko’s Kitchen or Kite Hill work wonderfully. Just ensure they are also frozen solid before grating.
Whole Milk: Adds richness and moisture to the dough. For a dairy-free version, unsweetened almond milk or full-fat canned coconut milk are excellent substitutes. Coconut milk will add a slightly richer texture, while almond milk keeps them lighter. Ensure your chosen dairy-free milk is unsweetened to control the sweetness of the scones.
Eggs: We use two eggs in this recipe. One egg is incorporated into the dough, acting as a binder and adding richness, contributing to a tender crumb. The second egg is used for an egg wash, brushed over the tops of the scones just before baking. This wash gives them a gorgeous golden-brown color and a slightly crispy, shiny finish.
Orange Zest: The star of the show for flavor! Fresh orange zest infuses the scones with a bright, aromatic citrus essence that pairs perfectly with cranberries. Use a microplane or a fine grater to get the zest, being careful to only get the colored part of the peel and not the bitter white pith underneath.
Lemon Juice: Though it might seem counterintuitive with orange scones, lemon juice plays a vital role. When combined with milk, it creates a quick “buttermilk” substitute. The acidity reacts with the baking powder, providing an extra lift and contributing to a more tender texture in the final scone.
Vanilla Extract: A classic flavor enhancer that adds warmth and depth to the scones, complementing the orange and cranberry notes beautifully.
Cranberries: These tart little berries are essential for the orange cranberry flavor profile. You can use either fresh or frozen cranberries. If using frozen, there’s no need to thaw them beforehand; simply toss them into the dough. Their tartness provides a wonderful contrast to the sweet dough and glaze.
Powdered Sugar & Fresh Orange Juice (for the Glaze): This simple combination creates a vibrant, sweet, and tangy glaze that elevates the scones. The powdered sugar dissolves easily, forming a smooth consistency, while fresh orange juice reinforces that delightful citrus flavor.
Crafting Your Easy Gluten-Free Orange Cranberry Scones: A Step-by-Step Guide
Creating these delightful scones is a rewarding process. Follow these simple steps for bakery-quality results right in your own kitchen:
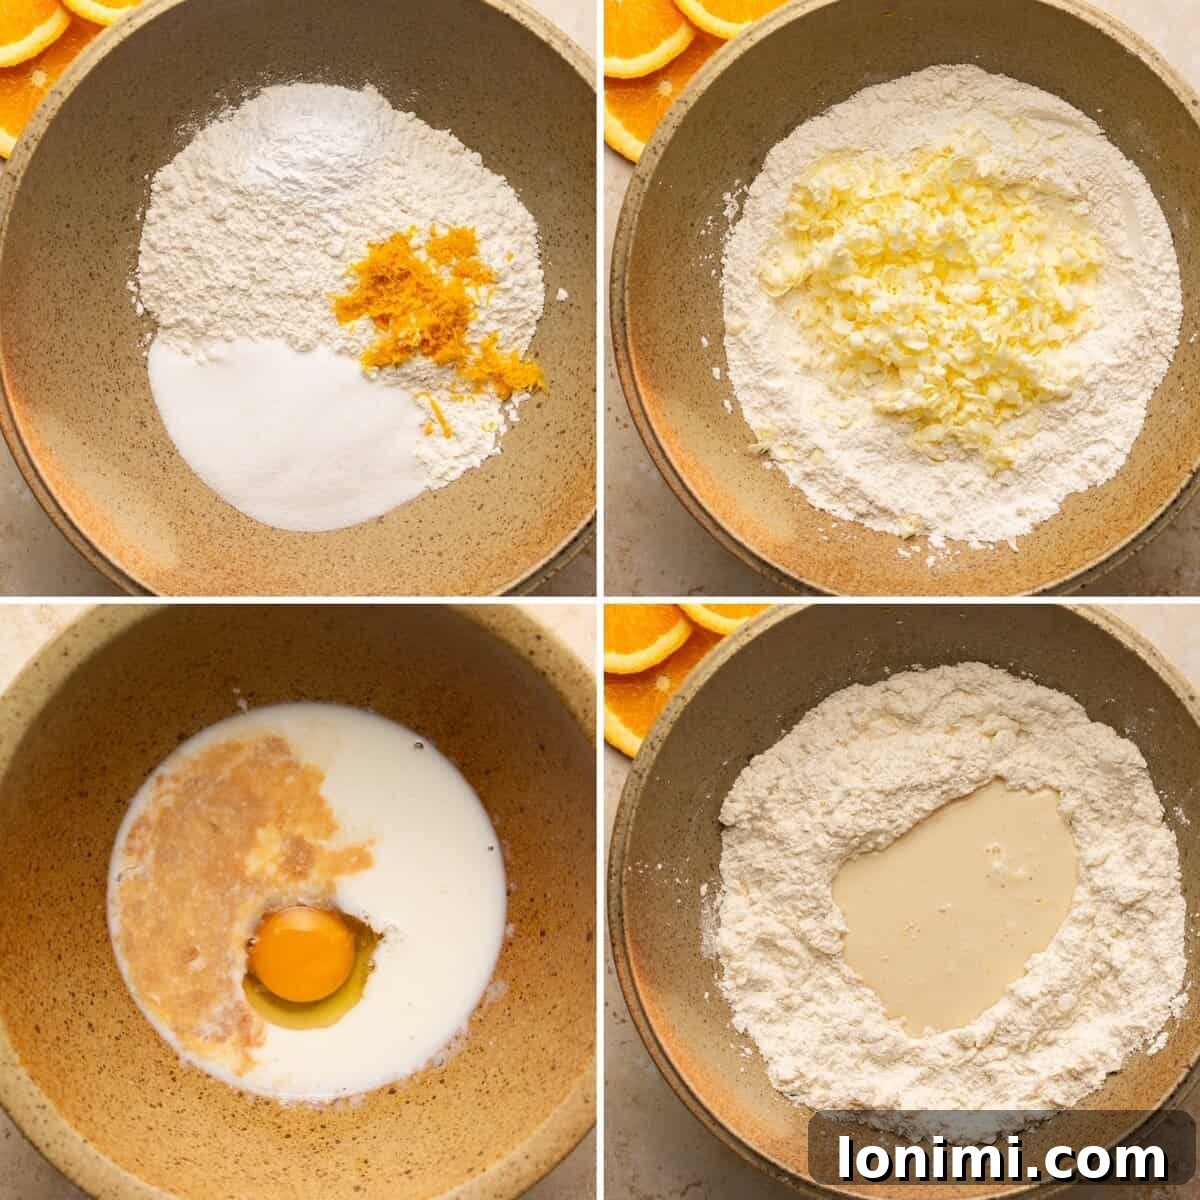
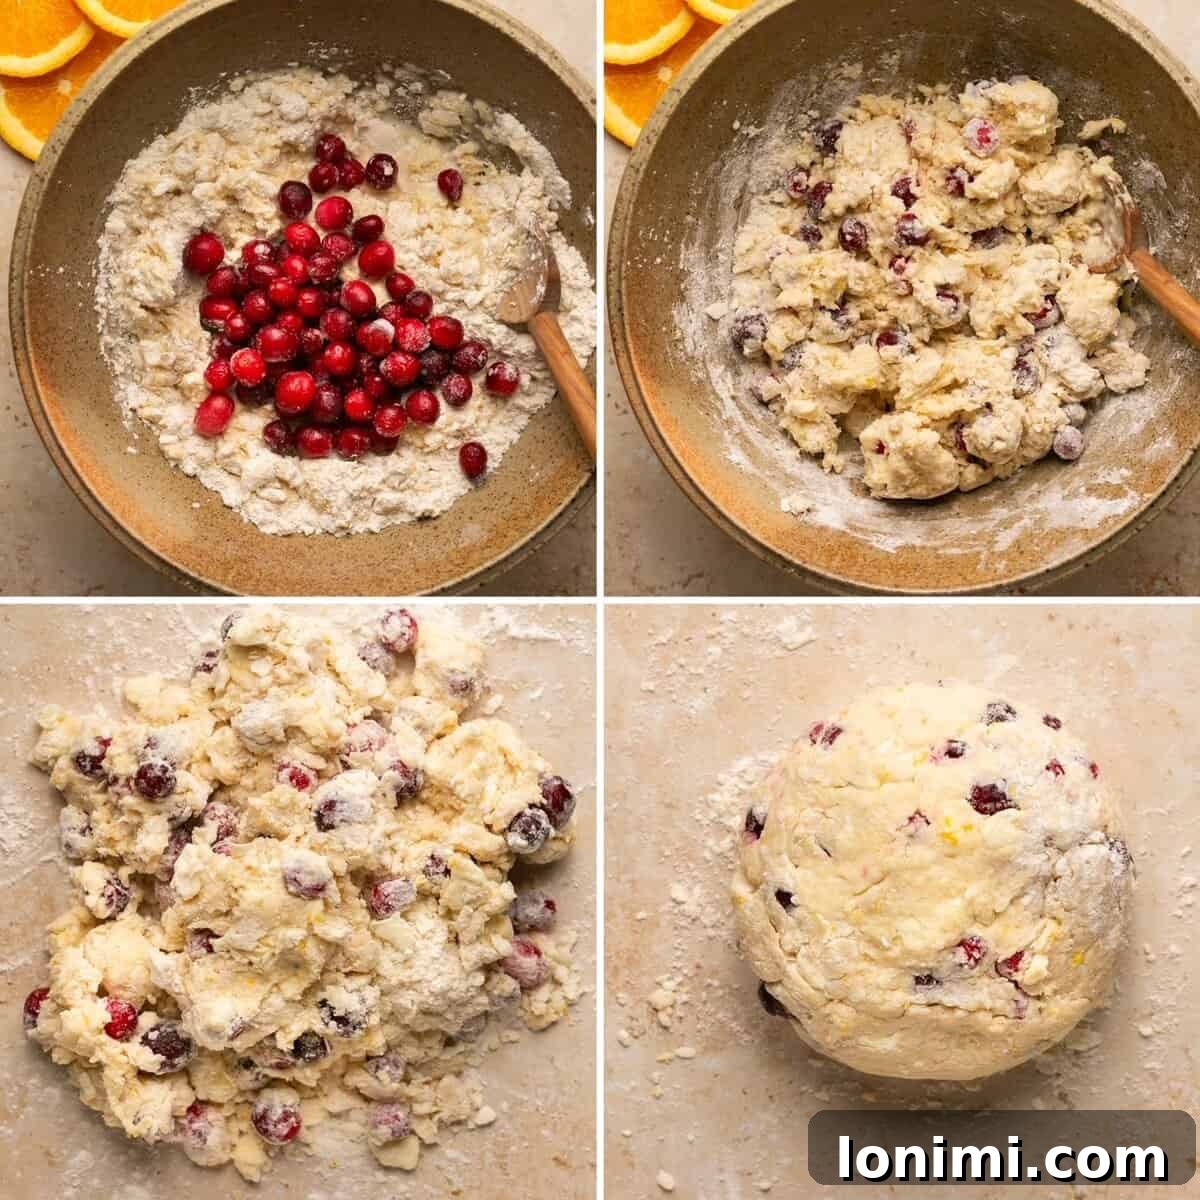
- Prepare Your Oven: Begin by preheating your oven to 400°F (200°C). This ensures the oven is at the correct temperature when your scones are ready to bake, helping them rise quickly and create that perfect flaky texture. Line a large baking sheet with parchment paper to prevent sticking and for easy cleanup.
- Combine Dry Ingredients: In a large mixing bowl, thoroughly whisk together the gluten-free flour blend, granulated sugar, gluten-free baking powder, and fresh orange zest. Whisking ensures all ingredients are evenly distributed, which is crucial for uniform rise and flavor throughout your scones.
- Incorporate the Cold Butter: Take your frozen or very cold salted butter and grate it directly into the dry ingredients using a box grater. This method creates tiny shards of butter, which are key for flakiness. Using two forks, a pastry cutter, or even your fingertips (working quickly to avoid warming the butter), cut the butter into the dry mixture until it resembles coarse crumbs with some pea-sized pieces of butter remaining. The goal is to keep the butter as cold as possible.
- Prepare the Wet Ingredients (“Buttermilk”): In a separate medium bowl, combine the whole milk (or dairy-free alternative) and lemon juice. Whisk them together; the mixture may curdle slightly, which is normal – this is your homemade “buttermilk” substitute. Then, crack one of the eggs into this mixture, add the vanilla extract, and whisk until everything is smooth and well combined.
- Gently Combine Wet and Dry: Pour the wet ingredient mixture into the butter/flour mixture. Add the cranberries (fresh or frozen) at this stage. Using a spatula or your hands, mix until the ingredients are just combined and a soft dough forms. It’s crucial not to overmix the dough, as overworking gluten-free flour can lead to tough scones, similar to wheat-based dough. Stop mixing as soon as no dry streaks of flour remain.
- Shape the Dough: Lightly flour a clean countertop or a large cutting board with a little extra gluten-free flour. Transfer the scone dough onto this surface. Lightly dust your hands with gluten-free flour to prevent sticking. Gently work the dough into a cohesive ball. Avoid kneading vigorously. Then, using your hands, press the dough down into an 8-inch (20 cm) disc shape, about 1-inch thick. While refrigerating the dough prior to baking isn’t strictly necessary for this recipe, you can wrap it in plastic wrap and chill it overnight if you prefer to bake fresh scones in the morning. Once shaped, use a sharp knife or a bench scraper to cut the disc into 8 uniform triangle wedges.
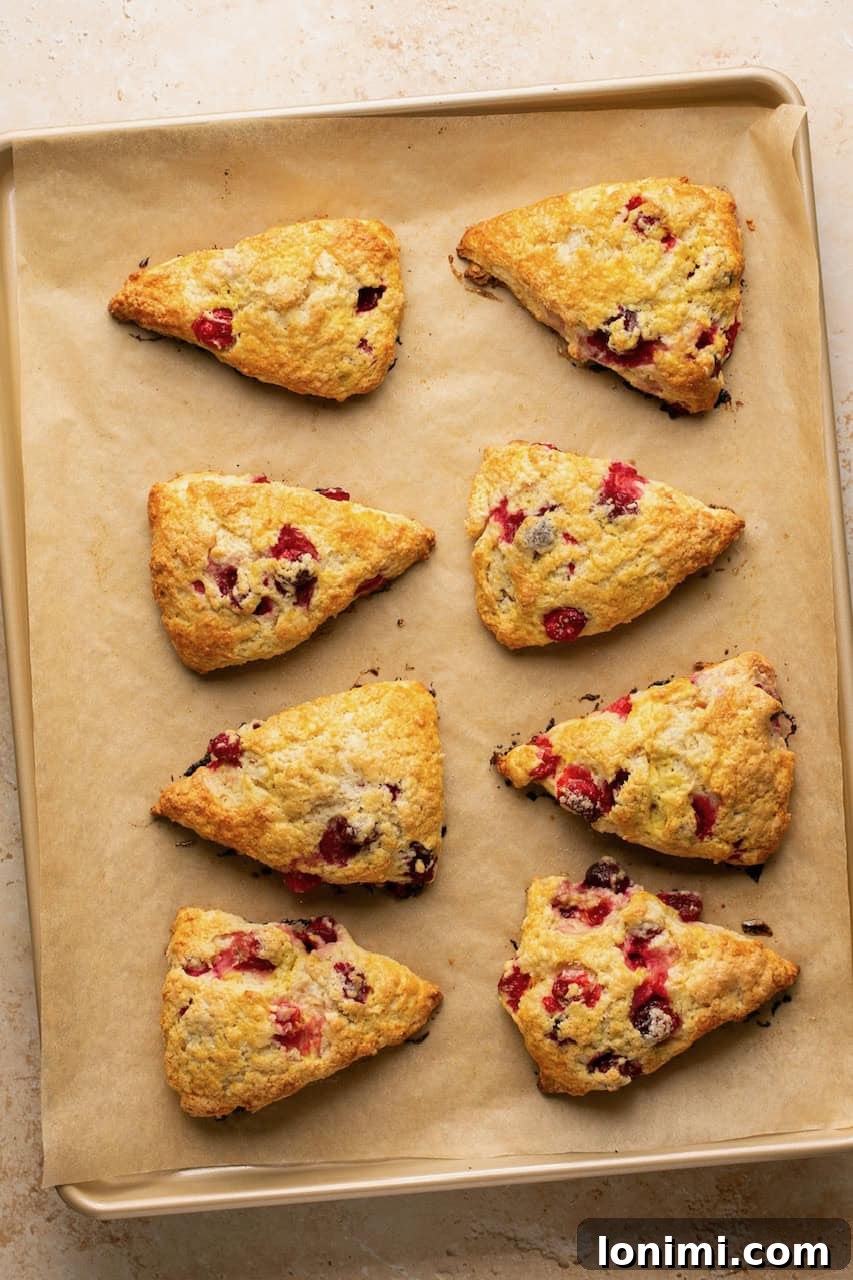
- Prepare for Baking: Carefully transfer the cut scone wedges onto the parchment-lined baking sheet, spacing them approximately 2 inches apart to allow for proper airflow and expansion. In a small bowl, lightly beat the remaining egg to create an egg wash. Using a pastry brush, gently brush the tops of each scone with the egg wash. Finally, sprinkle each scone generously with the reserved granulated sugar. This will give them a beautiful golden crust and a touch of sweetness.
- Bake to Golden Perfection: Place the baking sheet into your preheated 400°F (200°C) oven. Bake for 20-24 minutes, or until the edges appear golden brown and crispy, and the tops are a rich, appealing golden hue. The exact baking time may vary slightly depending on your oven. Once baked, remove the scones from the oven and transfer them to a wire rack to cool for at least 30 minutes. Cooling is important as it allows the internal structure to set.
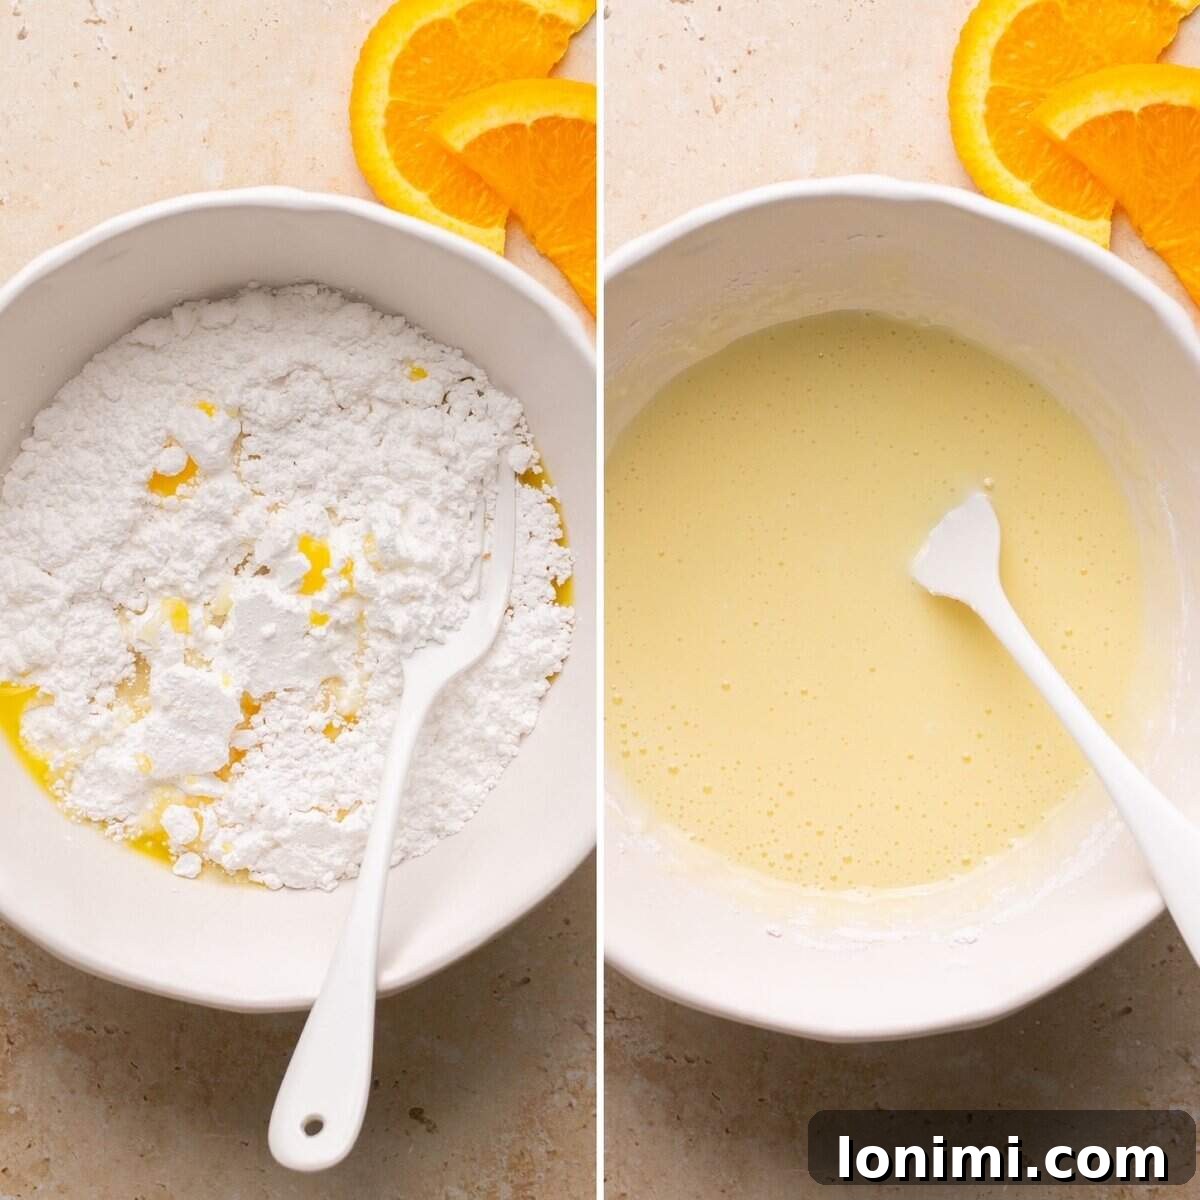
- Glaze and Enjoy: While the scones are cooling, prepare the orange glaze. In a small bowl, whisk together the powdered sugar and fresh orange juice until a smooth, pourable glaze forms. Once the scones have cooled sufficiently (they should still be slightly warm or at room temperature), generously drizzle the orange glaze over the tops. The glaze will harden as it sits, creating a beautiful finish. Serve immediately and savor every bite!
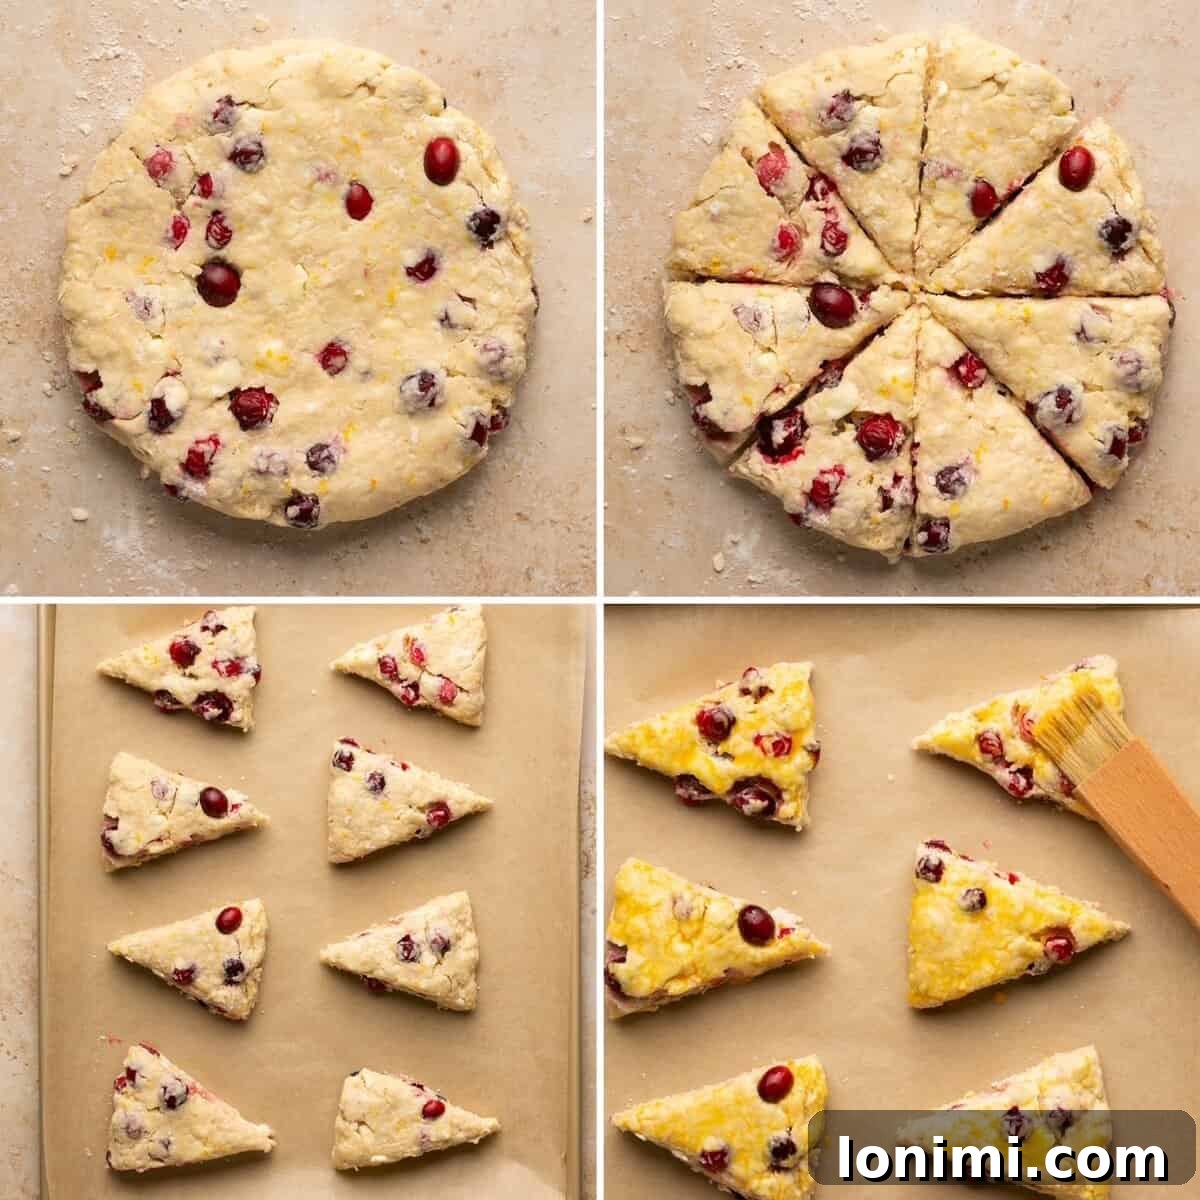
Creative Mix-ins & Smart Substitutions for Your Scones
While the orange and cranberry combination is truly exceptional, this recipe is wonderfully versatile, allowing you to customize your scones to suit any craving or dietary need. Don’t be afraid to get creative!
Flavorful Mix-ins: If orange and cranberry aren’t your preference, simply omit the orange zest, orange juice, and cranberries from the base recipe. Instead, you can incorporate a variety of other delicious additions. For a classic twist, add 1 cup of fresh blueberries (or frozen, unthawed) to the dough. Sliced strawberries or chocolate chips are also fantastic choices. Want a zesty lemon treat? Substitute the orange zest with lemon zest, and if making a glaze, use fresh lemon juice or a neutral non-dairy milk instead of orange juice. Other ideas include:
- Nuts: A half cup of chopped pecans, walnuts, or almonds can add a lovely crunch.
- Spices: A teaspoon of cinnamon or a half teaspoon of nutmeg can elevate the flavor profile, especially if pairing with apple or pumpkin purees (reduce liquid if adding wet ingredients).
- Dried Fruits: Chopped dried apricots, raisins, or currants can be used in place of or in addition to fresh berries. Make sure they are plump; soak them in warm water for 10 minutes and drain if they seem too dry.
- Tropical: Add shredded coconut and a touch of lime zest for a tropical flair.
Dairy-Free Option: Making these scones dairy-free is incredibly simple without compromising on flavor or texture. Instead of salted butter, use an equal amount of your favorite dairy-free butter substitute (such as Miyoko’s Kitchen or Kite Hill, ensuring it’s frozen). For the whole milk, swap in unsweetened almond milk or full-fat canned coconut milk. The rest of the recipe remains the same, allowing you to enjoy these delicious scones regardless of dairy preferences.
Savory Scones: You can even transform this sweet base into a savory delight! As mentioned in the FAQ, to make gluten-free cheese scones, replace the granulated sugar in the dough with ½ cup of shredded cheddar cheese. Omit the orange zest, cranberries, and the sweet glaze. Adding a tablespoon of fresh chopped chives or other herbs like rosemary or thyme would be an amazing addition, creating a perfect accompaniment to soups or as a standalone savory snack.

Expert Tips & Tricks for Perfect Scones
Achieving consistently amazing scones is easy when you keep a few key principles in mind. Here are some of my top tips and tricks to ensure your gluten-free orange cranberry scones turn out perfectly every time:
The Magic of a Pastry Cutter: While not strictly essential, a pastry cutter (or pastry blender) can be a true game-changer for this gluten-free scones recipe. Its design allows you to cut cold butter into the flour quickly and efficiently without warming it with your hands. If you don’t have one, don’t fret! You can absolutely achieve the same results using two forks to cross-cut the butter, or by using your fingertips, but remember to work very quickly.
Embrace Cold Butter: This is arguably the most critical tip for flaky scones. Always use butter that is frozen or very cold and grated. When tiny pieces of cold butter melt in a hot oven, they create steam pockets, which are responsible for the beautiful, flaky layers characteristic of a perfect scone. If you use butter that is too soft (refrigerated or, worse, room temperature), it will simply blend into the flour, resulting in a denser, less flaky scone, and a sticky dough that is difficult to work with.
Gentle Dough Shaping is Key: Unlike some other baked goods, scone dough thrives on a light touch. You don’t need a rolling pin for these gluten-free scones; your hands are your best tools! Gently press and shape the dough into an 8-inch disc. It’s incredibly important not to over-mix the dough or knead it too much. Overworking the dough, even gluten-free dough, can develop any starches and lead to tough, crumbly, or dense scones. Mix just until combined, then handle minimally for the most tender results.
Proper Storage for Freshness: To keep your leftover scones tasting their best, store them at room temperature in an airtight container. This will maintain their freshness and prevent them from drying out for up to 3 days. For a quick refresh, pop them in the microwave for a few seconds or warm them lightly in the oven.
Freezing for Future Enjoyment: These scones are fantastic for making ahead! To freeze baked scones, allow them to cool completely after baking and glazing. Then, transfer them to a freezer-safe bag or airtight container, separated by parchment paper, and freeze for up to 2 months. To enjoy, thaw at room temperature or gently reheat in a low oven. You can also freeze the unbaked scone wedges: arrange them on a baking sheet and freeze until solid. Once frozen, transfer them to a freezer bag. When ready to bake, place frozen scones on a parchment-lined baking sheet, brush with egg wash and sugar, and bake from frozen, adding a few extra minutes to the baking time.
Your Questions Answered: Gluten-Free Scones FAQ
Have some lingering questions about mastering gluten-free scones? Here are answers to some common inquiries that will help you bake with confidence:
What makes scones not soft?
Several factors can contribute to scones not being as soft and flaky as desired. The most common culprits are letting the dough get too warm or overmixing it. When the butter warms up, it loses its ability to create steam pockets for flakiness, resulting in a denser scone. Overmixing develops the gluten (even in gluten-free flours, starches can get overworked), leading to a tough, bready texture rather than a tender, crumbly one. Ensure your butter is very cold, and mix the dough only until just combined.
Should you put egg in scones?
Yes, absolutely! Eggs play a vital role in scone recipes. Incorporating an egg into the dough helps to bind the ingredients together, adds richness, and contributes to a more tender and moist crumb. Additionally, an egg wash (beaten egg brushed on top) before baking is highly recommended. I prefer using an egg wash over just milk because it helps the scones achieve a beautiful golden-brown color and a wonderfully crispy, shiny crust.
Can I make these into gluten-free cheese scones?
Yes, you certainly can, and they are absolutely delicious! To transform this recipe into savory gluten-free cheese scones, I recommend making the following adjustments: replace the granulated sugar in the dough with ½ cup of shredded sharp cheddar cheese. You’ll also want to omit the orange zest, cranberries, and the sweet orange glaze. For an extra layer of flavor, finely chopped fresh chives, a touch of black pepper, or a pinch of garlic powder would be amazing additions, creating a savory pastry perfect for breakfast, brunch, or alongside a meal.
How do I know my scones are baked through?
Scones are typically baked through when they have a golden-brown exterior, particularly around the edges and on top. The top should feel firm to the touch, and if you tap the bottom of a scone, it should sound hollow. You can also insert a wooden skewer or toothpick into the center; if it comes out clean with no wet dough, your scones are ready. Keep an eye on them, as oven temperatures can vary.
What is the difference between scones and biscuits?
While often confused, scones and biscuits have distinct differences. Scones, particularly British-style scones, often contain eggs and sometimes a bit more sugar or fruit, leading to a richer, slightly sweeter, and more delicate crumb. They are traditionally served with clotted cream and jam. Biscuits (American-style), on the other hand, are typically made with just flour, fat, milk or buttermilk, and baking powder, resulting in a savory, fluffier, and often more robust texture, usually served with gravy or butter. Both aim for flaky layers, but their flavor profiles and traditional accompaniments differ significantly.

Explore More Gluten-Free & Dairy-Free Sweet Treats
If you loved these delightful scones, you’re in for a treat! Discover more fantastic gluten-free and dairy-free dessert recipes to satisfy your sweet cravings:
Decadent Chocolate Chip Mug Cake
Healthy & Flavorful Pumpkin Banana Muffins
Classic Gluten-Free Gingersnaps
Easy-to-Make Gluten-Free Pecan Pie (Corn Syrup-Free!)
Wholesome & Delicious Healthy Apple Crumble
Love this recipe? Please leave a 5-star 🌟🌟🌟🌟🌟 rating in the recipe card below & a review in the comment section. Or, follow me on Facebook, Pinterest or Instagram today!
Easy Gluten-Free Scones Recipe (Dairy-Free Option)
By: Mary Smith
Prep Time: 15 mins
Cook Time: 24 mins
Total Time: 1 hr 9 mins
Yield: 8 scones
This easy gluten-free scones recipe with orange and cranberries is the perfect cozy treat. They are flaky, slightly sweet, and delicious with a cup of coffee. Easily made dairy-free!
Equipment
- Pastry Cutter (optional, but helpful)
- Box Grater
- Large Mixing Bowls
- Whisk
- Parchment Paper
- Baking Sheet
- Sharp Knife or Bench Scraper
- Pastry Brush (for egg wash)
- Wire Cooling Rack
Ingredients
Scones
- 2 cups King Arthur Baking Measure for Measure Flour (or your preferred 1:1 gluten-free flour blend)
- ⅓ cup granulated sugar, plus 1 tbsp for dusting
- 2 tsp gluten-free baking powder
- 1 tbsp orange zest (from about 1 large orange)
- ½ cup salted butter, frozen or very cold (use vegan butter like Miyoko’s or Kite Hill for dairy-free)
- ½ cup whole milk (sub unsweetened almond milk or full-fat coconut milk for dairy-free)
- 1 tsp lemon juice
- 2 large eggs, divided (one for dough, one for egg wash)
- 1 tsp vanilla extract
- 1 cup cranberries, frozen or fresh
Orange Glaze
- 1 cup organic powdered sugar
- 2.5 tbsp fresh orange juice
Instructions
- Preheat your oven to 400°F (200°C). Line a large baking sheet with parchment paper.
- In a large bowl, whisk together the gluten-free flour, ⅓ cup granulated sugar, baking powder, and orange zest.
- Grate the frozen butter directly into the dry ingredients using a box grater. Using two forks or a pastry cutter, cut the butter into the flour mixture until it resembles coarse crumbs with some pea-sized pieces of butter remaining. Avoid overworking the butter.
- In a separate medium bowl, whisk together the milk and lemon juice to create a “buttermilk” substitute. Add one of the eggs and the vanilla extract, then whisk until smooth.
- Pour the wet ingredients into the butter/flour mixture. Add the cranberries. Mix with a spatula or your hands until just combined; do not overmix.
- Transfer the dough to a lightly floured countertop or cutting board. Lightly flour your hands, then gently work the dough into a ball. Press it down into an 8-inch disc shape, about 1 inch thick. Cut the disc into 8 triangle wedges using a sharp knife.
- Place the scone wedges 2 inches apart on the prepared baking sheet. Beat the remaining egg in a small bowl to create an egg wash, then brush it over the tops of each scone. Sprinkle each scone with the reserved 1 tablespoon of granulated sugar.
- Bake for 20-24 minutes, or until the edges are golden brown and crispy, and the tops are a deep golden color. Remove from the oven and let them cool on a wire rack for at least 30 minutes.
- While the scones cool, prepare the glaze: whisk together the powdered sugar and fresh orange juice until smooth. Drizzle the glaze generously over the tops of the cooled scones. The glaze will harden as it sets. Enjoy your delicious homemade gluten-free orange cranberry scones!
Notes
Mix-ins: Get creative with your scone flavors! If you prefer not to make orange cranberry scones, simply omit the orange zest, orange juice, and cranberries. Instead, you can fold in 1 cup of fresh blueberries, sliced strawberries, or chocolate chips. For lemon blueberry scones, use lemon zest instead of orange zest, and use unsweetened almond milk or lemon juice for the glaze instead of orange juice. Consider adding chopped nuts, other dried fruits, or warming spices like cinnamon or nutmeg.
Dairy-Free Option: To make these scones dairy-free, substitute the salted butter with an equal amount of your favorite frozen dairy-free butter substitute (e.g., Miyoko’s Kitchen, Kite Hill). Replace the whole milk with unsweetened almond milk or full-fat canned coconut milk. The rest of the recipe remains the same, ensuring a delicious dairy-free treat.
Pastry Cutter: A pastry cutter can make incorporating the butter into the flour much easier and quicker, helping to keep the butter cold. If you don’t have one, two forks or your fingertips (working quickly) will also do the trick.
Cold Butter is Crucial: For the flakiest scones, always use butter that is frozen or very cold and grated. This creates pockets of steam during baking, which results in those desirable layers. Warm butter will integrate too much into the dough, leading to a denser scone.
Shaping the Dough: There’s no need for a rolling pin with this recipe! Simply use your hands to gently press the dough into an 8-inch disc. Avoid over-mixing or kneading the dough excessively, as this can lead to tough scones, even with gluten-free flour blends. A light, gentle touch is best for tenderness.
Storage: Store any leftover scones in an airtight container at room temperature for up to 3 days to maintain their freshness. For a quick refresh, microwave them briefly or warm them in a low oven.
Freezing: These scones are excellent for freezing! After baking and cooling completely, place them in a freezer-safe bag or airtight container. They can be frozen for up to 2 months. Thaw at room temperature or reheat in the oven for a freshly baked taste. You can also freeze the unbaked scone wedges on a baking sheet until solid, then transfer to a freezer bag. Bake from frozen, adding a few extra minutes to the bake time.
Nutrition
Serving: 1 scone | Calories: 328kcal | Carbohydrates: 48g | Protein: 5g | Fat: 14g | Saturated Fat: 8g | Polyunsaturated Fat: 1g | Monounsaturated Fat: 4g | Trans Fat: 0.5g | Cholesterol: 73mg | Sodium: 219mg | Potassium: 66mg | Fiber: 4g | Sugar: 26g | Vitamin A: 460IU | Vitamin C: 6mg | Calcium: 110mg | Iron: 1mg
All nutrition facts are an estimate and automatically calculated. While I fact check them using My Fitness Pal, please note that they may not always be 100% accurate and depend on ingredients used. Weigh your total and divide by the number of servings for the most accurate grams per serving size.